En aquest article explique, pas a pas, com he anat muntant un nou servidor d'aplicacions web a la Raspberry Pi 4 amb 8 GB de RAM amb FreeBSD 15 des de zero.
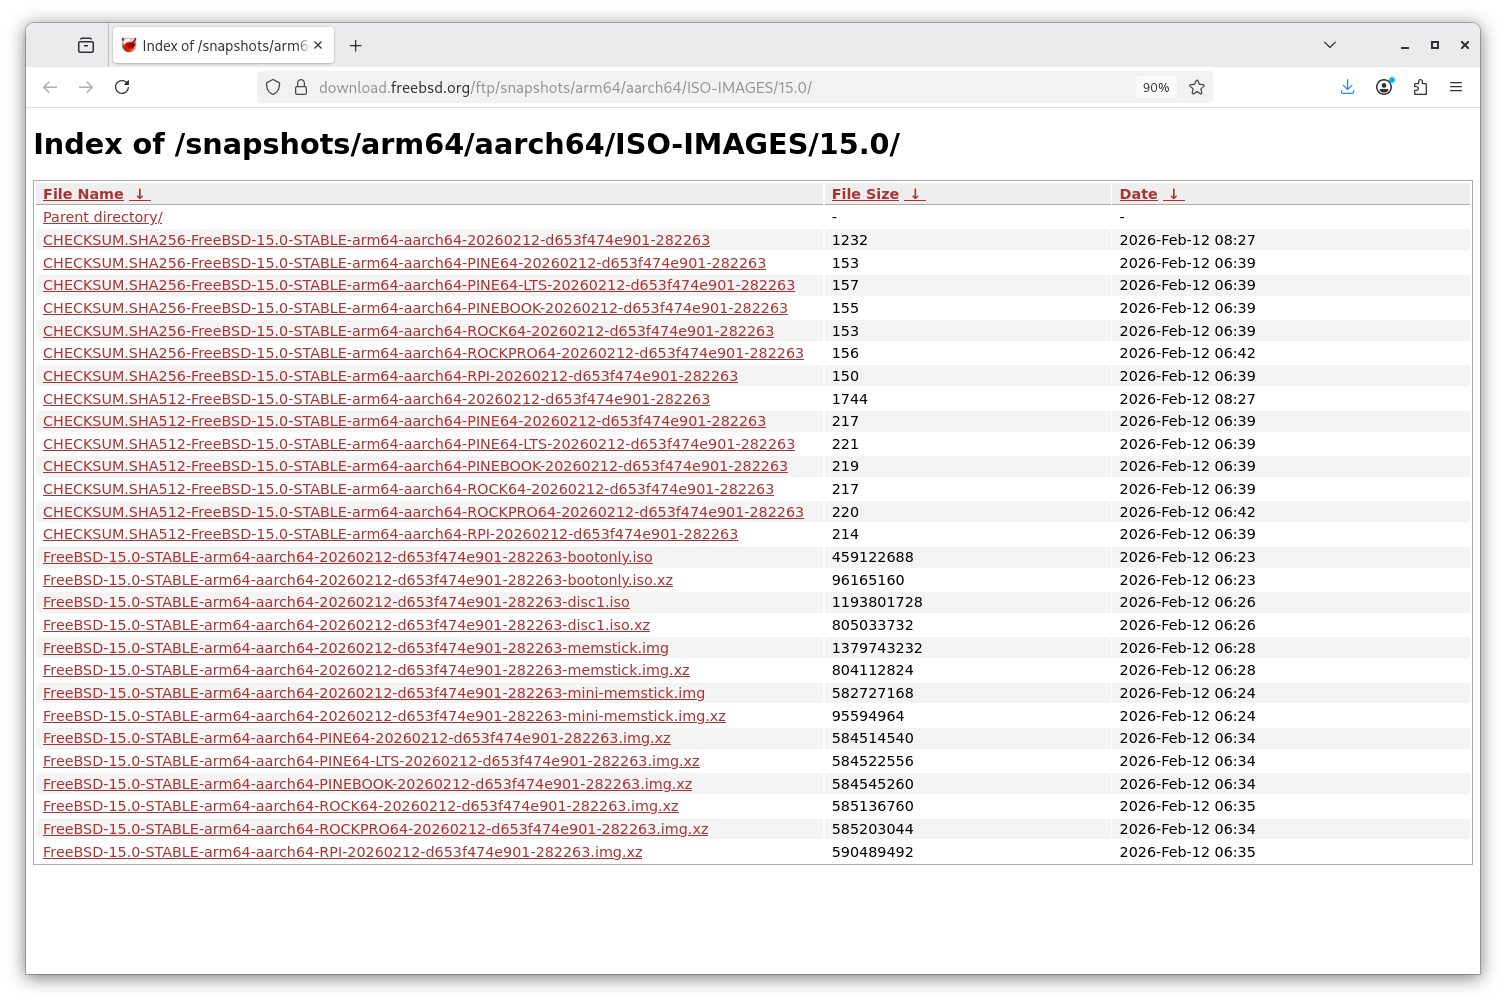
Començarem descarregant la última Release de FreeBSD 15 per a arm6 des el repositori oficial del projecte. No descarregarem cap snapshot sinó a una release oficial.
Des de l'ordinador on cremarem la imatge en una microSD, executem:
dmesg
I veurem que ens dóna el dispositiu /dev/sda amb diverses particions: sda1, sda2, i sda2 té dues particions amb format ufs propi de FreeBSD que no sap muntar: sda5 i sda6:
[40032.359010] usb-storage 3-6:1.0: USB Mass Storage device detected
[40032.359519] scsi host0: usb-storage 3-6:1.0
[40032.359705] usbcore: registered new interface driver usb-storage
[40032.378665] usbcore: registered new interface driver uas
[40033.366370] scsi 0:0:0:0: Direct-Access     Generic  STORAGE DEVICE   0272 PQ: 0 ANSI: 0
[40033.389581] sd 0:0:0:0: Attached scsi generic sg0 type 0
[40033.590617] sd 0:0:0:0: [sda] 499744768 512-byte logical blocks: (256 GB/238 GiB)
[40033.592234] sd 0:0:0:0: [sda] Write Protect is off
[40033.592240] sd 0:0:0:0: [sda] Mode Sense: 0b 00 00 08
[40033.593228] sd 0:0:0:0: [sda] No Caching mode page found
[40033.593232] sd 0:0:0:0: [sda] Assuming drive cache: write through
[40033.640168]  sda: sda1 sda2
                sda2:
[40033.641283] sd 0:0:0:0: [sda] Attached SCSI removable disk
[40034.344454] ufs: ufs was compiled with read-only support, can't be mounted as read-write
[40034.351192] ufs: You didn't specify the type of your ufs filesystem
.
mount -t ufs -o ufstype=sun|sunx86|44bsd|ufs2|5xbsd|old|hp|nextstep|nextstep-cd|openstep ...
.
>>>WARNING Wrong ufstype may corrupt your filesystem, default is ufstype=old
[40034.360441] ufs: ufs_fill_super(): bad magic number
Descomprimirem la imatge de la release descarregada:
$ unxz FreeBSD-15.0-RELEASE-arm64-aarch64-RPI.img.xz
Comprovarem i veurem que el fitxer .img ocupa 2 Gigues:
$ du -h FreeBSD-15.0-RELEASE-arm64-aarch64-RPI.img
2,2G	FreeBSD-15.0-RELEASE-arm64-aarch64-RPI.img
I ara cremarem la microSD amb la imatge:
# dd if=./FreeBSD-15.0-RELEASE-arm64-aarch64-RPI.img of=/dev/sda bs=1M
5120+0 records in
5120+0 records out
5368709120 bytes (5.4 GB, 5.0 GiB) copied, 566.436 s, 9.5 MB/s
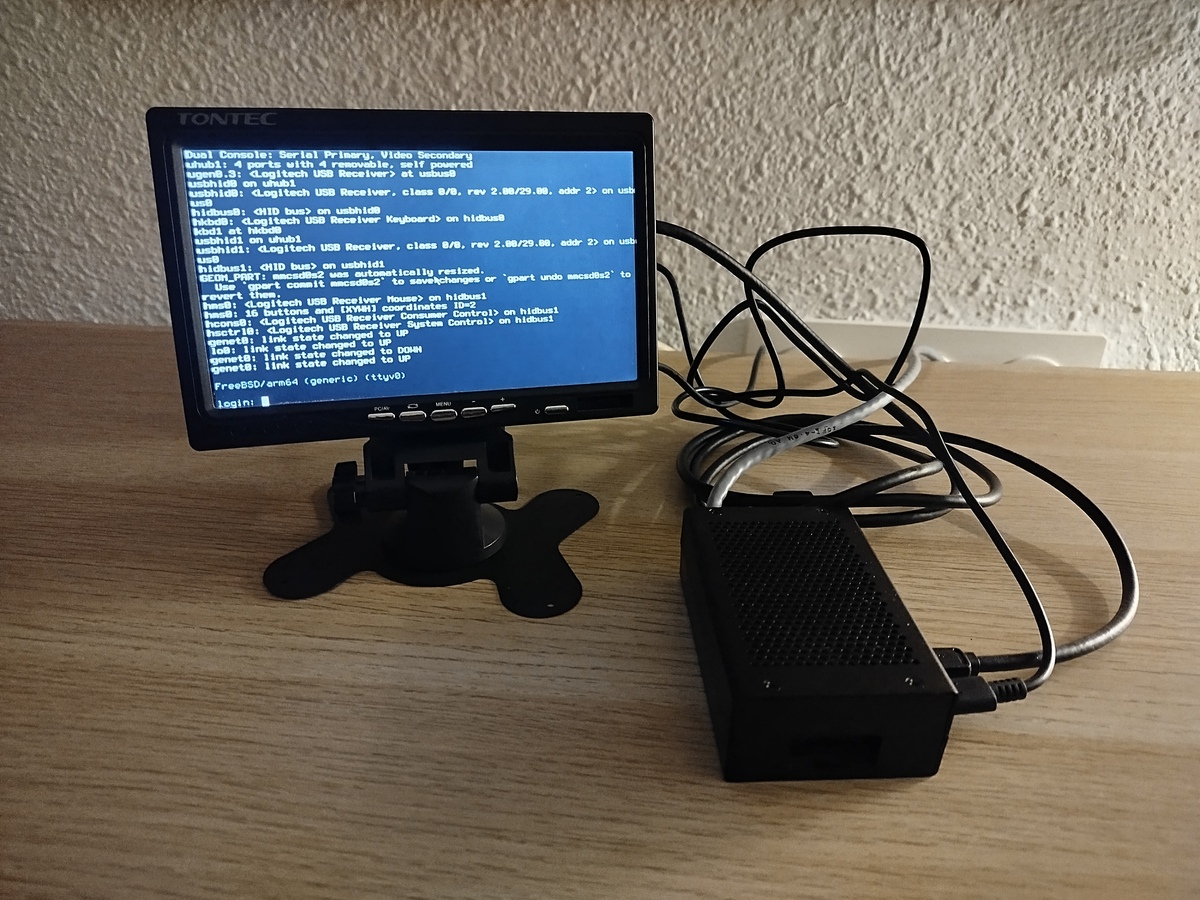
Introduïm la microSD i iniciem la Raspberry Pi 4. Comencem!
INICIEM LA RASPBERRY PI PER PRIMERA VEGADA
La primera vegada entrarem amb l'usuari root i contrasenya root, i li canviarem la contrasenya amb:
passwd
També crearem l'usuari o usuaris que necessitem en aquest servidor amb:
adduser
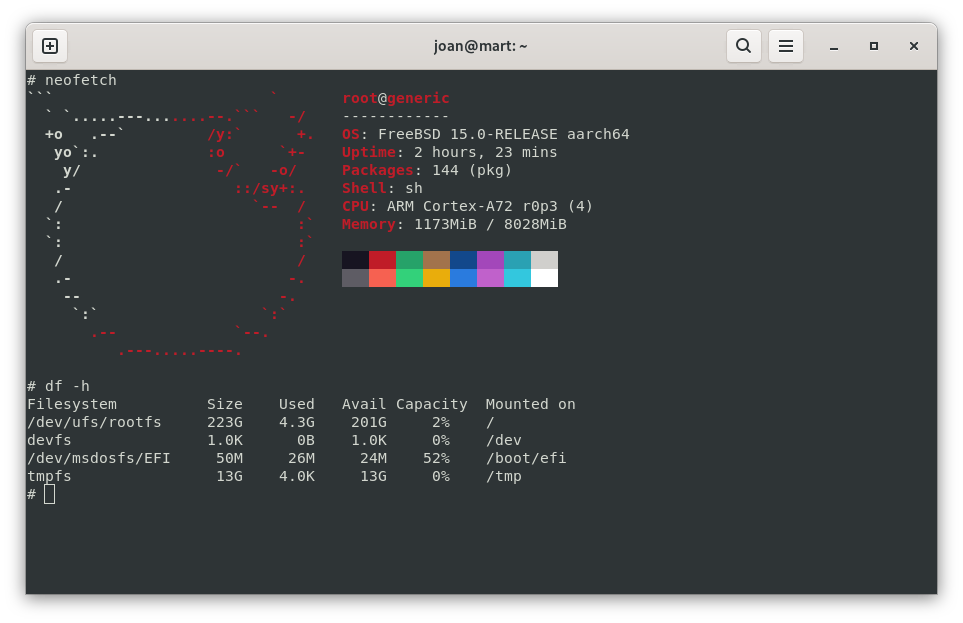
Ja tenim un sistema FreeBSD 15 preparat:
$ uname -a
FreeBSD generic 15.0-STABLE FreeBSD 15.0-STABLE stable/15-n282114-770479c4cea0 GENERIC arm64
Fiquem el sistema en hora correcta, o de lo contrari no podrem instal·lar paquets amb pkg:
ntpdate pool.ntp.org
El primer que farem serà actualtizar patches (COM ES DIU???) i instal·lar els paquets bàsics:
# freebsd-update fetch
Ara ja podem començar a instal·lar paquets:
# pkg install doas htop wget curl screen emacs tmux nmap
Editem /usr/local/etc/doas.conf i afegim el següent:
permit nopass EL_NOSTRE_USUARI
Configure l'hora automàtica per a que sempre estiga sincronitzada correctament quan iniciem la Raspberry:
doas sysrc ntpd_enable="YES"
doas service ntpd start
La primera vegada, forcem una sincronització de l'hora immediata:
doas ntpd -gq
INSTAL·LEM NGINX
Comencem instal·lant el meu servidor web favorit:
$ doas pkg install nginx
Marcarem l'arranc automàtic quan iniciem la Raspberry Pi 4 afegint a /etc/rc.conf el següent:
echo 'nginx_enable="YES"' >> /etc/rc.conf
I arranquem, aturem o reiniciem el servei sempre que ho necessitem amb:
$ doas service nginx start|stop|restart
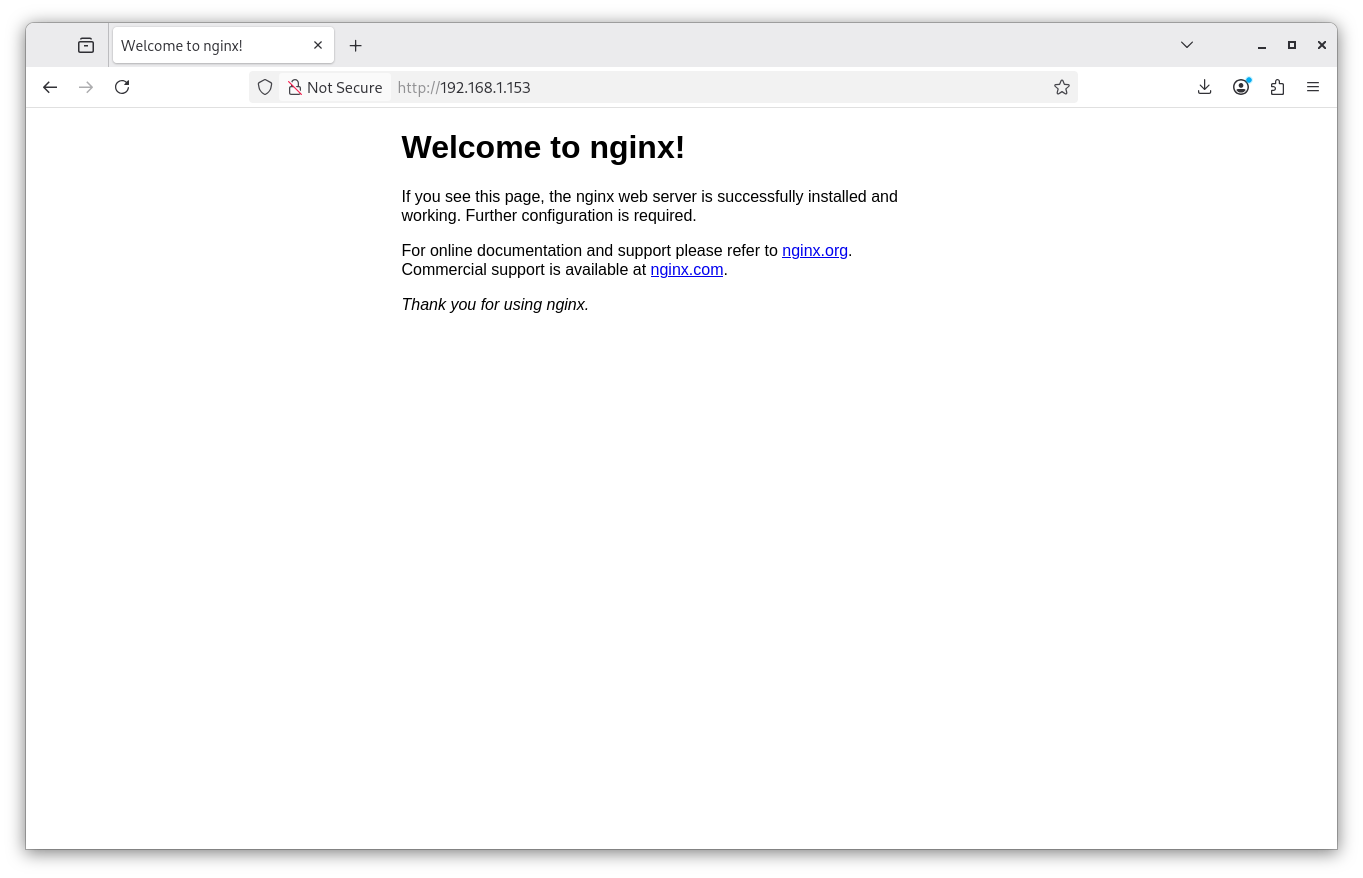
Ja tenim l'Nginx funcionant:
Instal·lem PHP 8.4
Ara anem a instal·lar els paquets de PHP 8.4 necessaris per a Drupal 11 de la següent manera:
$ doas pkg install php84 php84-curl php84-gd php84-opcache php84-pdo_mysql php84-xml php84-zip php84-tokenizer php84-dom php84-filter php84-session php84-simplexml php84-mbstring php84-pdo_sqlite
Marcarem l'arranc automàtic de PHP 8.4 quan iniciem la Raspberry Pi 4 afegint a /etc/rc.conf el següent:
php_fpm_enable="YES";
I arrancarem, aturarem o reiniciarem PHP 8.4 sempre que vullguem amb:
$ doas service php_fpm start
Performing sanity check on php-fpm configuration:
[04-Jan-2026 11:36:26] NOTICE: configuration file /usr/local/etc/php-fpm.conf test is successful
Starting php_fpm.
Ara, per tal de que PHP 8.4 s'execute correctament a les pàgines amb extensió .php editarem el fitxer /usr/local/etc/php-fpm.d/www.conf i buscarem la línia on diu:
listen = 127.0.0.1:9000
i ho reemplaçarem per:
listen = /var/run/php84-fpm.sock
Descomentem les 3 línies:
listen.owner = www
listen.group = www
listen.mode = 0660
Finalment desarem el fitxer i reiniciarem el servei php_fpm amb:
# service php_fpm restart
Performing sanity check on php-fpm configuration:
[07-Apr-2023 06:28:42] NOTICE: configuration file /usr/local/etc/php-fpm.conf test is successful
#
Stopping php_fpm.
Waiting for PIDS: 1540.
Performing sanity check on php-fpm configuration:
[07-Apr-2023 06:28:42] NOTICE: configuration file /usr/local/etc/php-fpm.conf test is successful
#
Starting php_fpm.
Configurarem el php.ini, mourem el fitxer /usr/local/etc/php.ini-production per /usr/local/etc/php.ini i reiniciarem php-fpm:
# doas mv /usr/local/etc/php.ini-production /usr/local/etc/php.ini
# doas service php_fpm restart
Performing sanity check on php-fpm configuration:
[04-Jan-2026 11:44:21] NOTICE: configuration file /usr/local/etc/php-fpm.conf test is successful
Stopping php_fpm.
Waiting for PIDS: 10303.
Performing sanity check on php-fpm configuration:
[04-Jan-2026 11:44:22] NOTICE: configuration file /usr/local/etc/php-fpm.conf test is successful
Starting php_fpm.
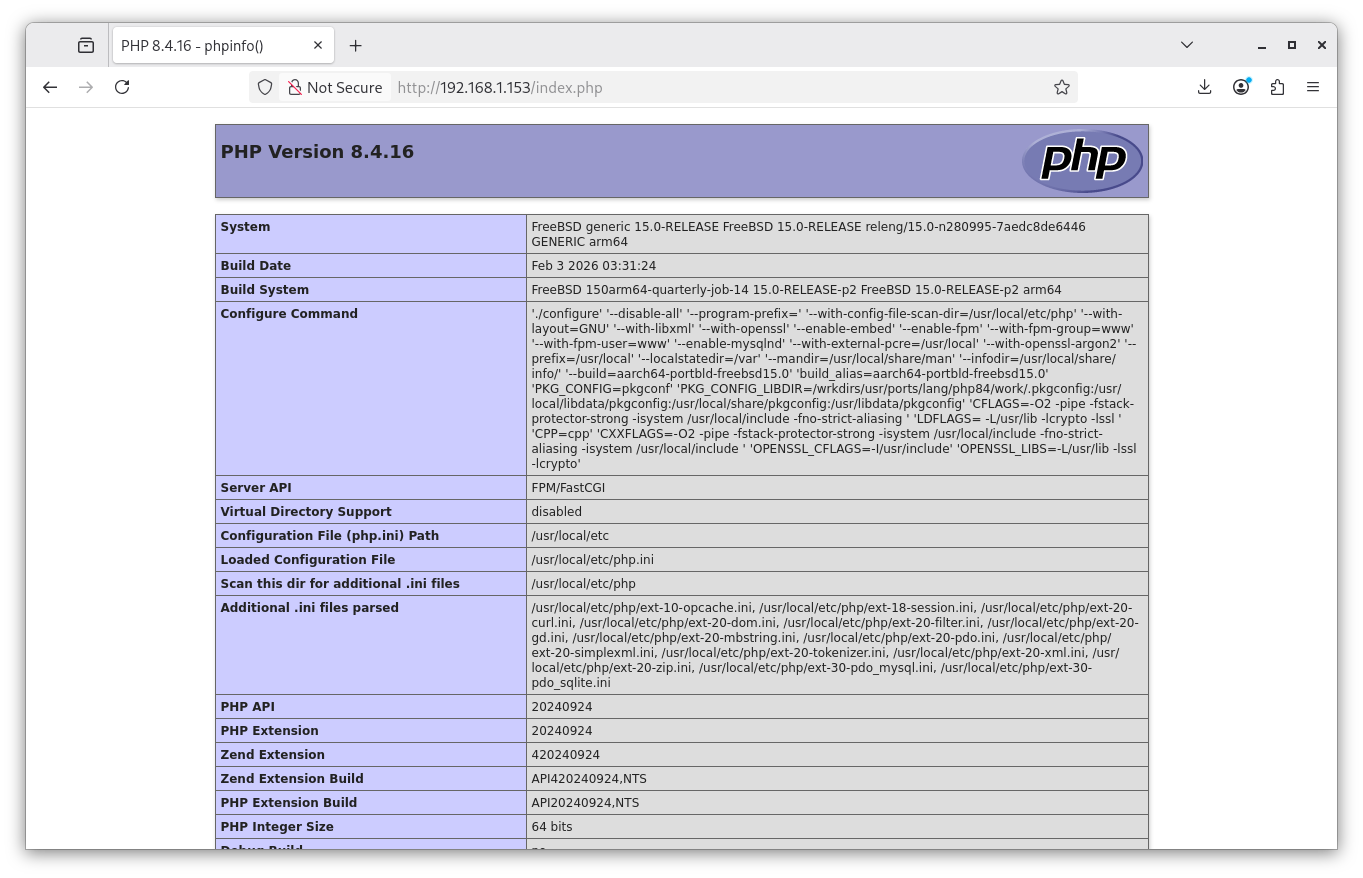
I ja podem veure que PHP 8.4 funciona perfectament, podem incloure la funció infophp(); en una pàgina php per a veure totes les variables i versions que tenim:
INSTAL·LACIÓ I CONFIGURACIÓ DE MARIADB
Instal·lem la última versió del servidor MariaDB amb:
$ doas pkg install mariadb118-server-11.8.5 mariadb118-client-11.8.5
Configurem l'arranc automàtic quan iniciem la Raspberry Pi 4 afegint a /etc/rc.conf:
mysql_enable="YES"
Iniciem el servei:
$ doas service mysql-server start
La primera vegada que anem a executar MariaDB necessitem executar aquesta ordre per a configurar la contrasenya de l'administrador, autoritzar-li o no l'àccès remot, esborrar l'usuari anònim de consulta i esborrar la base de dades test inicial que crea MariaDB:
$ doas mysql_secure_installation
I ens donarà el següent resultat:
$  doas mysql_secure_installation
/usr/local/bin/mysql_secure_installation: Deprecated program name. It will be removed in a future release, use 'mariadb-secure-installation' instead
#
NOTE: RUNNING ALL PARTS OF THIS SCRIPT IS RECOMMENDED FOR ALL MariaDB
      SERVERS IN PRODUCTION USE!  PLEASE READ EACH STEP CAREFULLY!
#
In order to log into MariaDB to secure it, we'll need the current
password for the root user. If you've just installed MariaDB, and
haven't set the root password yet, you should just press enter here.
#
Enter current password for root (enter for none):
OK, successfully used password, moving on...
#
Setting the root password or using the unix_socket ensures that nobody
can log into the MariaDB root user without the proper authorisation.
#
You already have your root account protected, so you can safely answer 'n'.
#
Switch to unix_socket authentication [Y/n] Y
Enabled successfully!
Reloading privilege tables..
 ... Success!
#
You already have your root account protected, so you can safely answer 'n'.
#
Change the root password? [Y/n] Y
New password:
Re-enter new password:
Password updated successfully!
Reloading privilege tables..
 ... Success!
#
By default, a MariaDB installation has an anonymous user, allowing anyone
to log into MariaDB without having to have a user account created for
them.  This is intended only for testing, and to make the installation
go a bit smoother.  You should remove them before moving into a
production environment.
#
Remove anonymous users? [Y/n] Y
 ... Success!
#
Normally, root should only be allowed to connect from 'localhost'.  This
ensures that someone cannot guess at the root password from the network.
#
Disallow root login remotely? [Y/n] Y
 ... Success!
#
By default, MariaDB comes with a database named 'test' that anyone can
access.  This is also intended only for testing, and should be removed
before moving into a production environment.
#
Remove test database and access to it? [Y/n] Y
 - Dropping test database...
 ... Success!
 - Removing privileges on test database...
 ... Success!
#
Reloading the privilege tables will ensure that all changes made so far
will take effect immediately.
#
Reload privilege tables now? [Y/n] Y
 ... Success!
#
Cleaning up...
#
All done!  If you've completed all of the above steps, your MariaDB
installation should now be secure.
#
Thanks for using MariaDB!
Ara crearem la primera base de dades, l'anomenarem "drupal1_db", i també crearem un usuari (usuari) i li donarem permisos totals en eixa base de dades:
# mysql -u root -p
Enter password:
Welcome to the MariaDB monitor. Commands end with ; or \g.
Your MariaDB connection id is 13
Server version: 11.8.5-MariaDB FreeBSD Ports
#
Copyright (c) 2000, 2018, Oracle, MariaDB Corporation Ab and others.
#
Type 'help;' or '\h' for help. Type '\c' to clear the current input statement.
#
root@localhost [(none)]> CREATE DATABASE drupal1_db CHARACTER SET utf8mb4 COLLATE utf8mb4_unicode_ci;
Query OK, 1 row affected (0.008 sec)
#
root@localhost [(none)]> GRANT SELECT, INSERT, UPDATE, DELETE, CREATE, DROP, INDEX, ALTER, CREATE TEMPORARY TABLES ON drupal1_db.* TO 'usuari'@'localhost' IDENTIFIED BY 'ESCRIU_ACÍ_LA_TEUA_CONTRASENYA_SUPERSEGURA';
Query OK, 0 rows affected (0.004 sec)
#
root@localhost [(none)]> flush privileges;
Query OK, 0 rows affected (0.002 sec)
I ja tenim creada la primera base de dades.
A partir ja és qüestió d'anar muntant projectes webs amb Nginx, PHP 8.4 i bases de dades. La veritat és que les Raspberry Pi són unes màquines que han canviat el panorama tècnic dels servidors i dels desenvolupadors, perquè ofereixen un rendiment molt bo amb un consum mínim.
El servidor FreeBSD 15 ja està perfectament preparat amb els 8 GB de RAM i 256 GB d'espai de disc.